It’s safe to say that product photography is the backbone of e-commerce sales. The quality of your product images plays a very important role in the sales of your products. A good image makes customers want to buy the product but it takes the correct techniques to get the shot that can make it possible.
In the list of the factors that decide whether an image is good enough or not, lighting comes in the top 3. I mean, isn’t it obvious, we are seeing the product because light is falling on it. So, it makes complete sense that lighting decides whether the image will be attractive or not.
The next question is, which light is best for product photography? Well, that’s a tricky question, as it doesn’t have any straight answer. So, before looking into which light is good for photography, let’s understand the multiple types of product photography lighting setups that you can use:
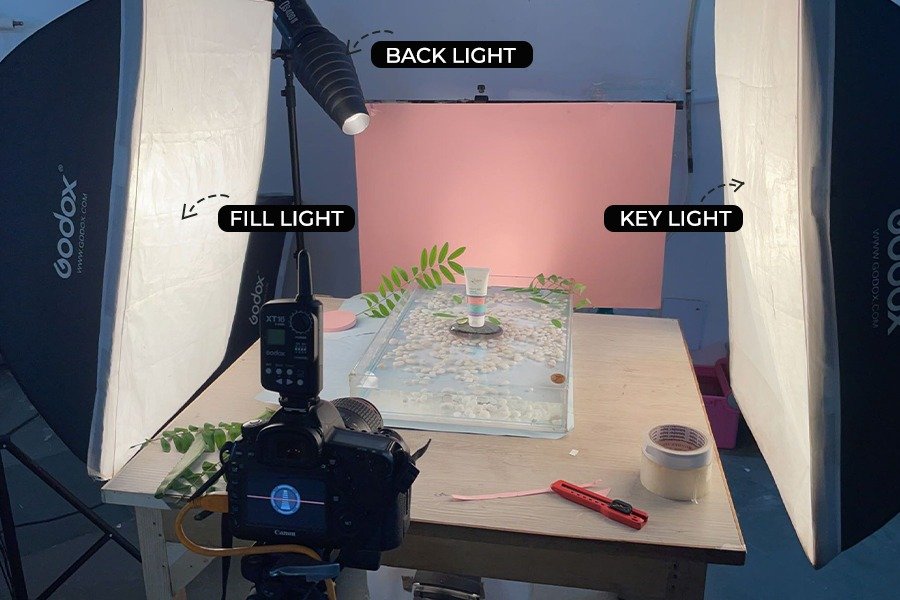
Key Light: As the name suggests, it is the key light, which means it is the main light source in your product photography setup. In general shoots, it is placed in front of the product but made sure that it is off-axis from the camera. Its function is to improve product visibility and image =e resolution.
Fill Lights: These are the low-intensity lights that are used as secondary lights in the setup. It helps to make an even-light environment around the product.
Backlight: This one is almost obvious, it is situated behind the product. It helps to give a better definition of the product image.
Now that we know the basic setups, it’s time to understand why is good lighting important in product photography and then we will see which light is best for product photography.
Let’s dive in,
How Does Lighting Help in Product Photography
In the world of product photography, lighting is like the secret ingredient that turns a good shot into a jaw-dropping one.
Now, lighting isn’t just about flipping a switch. It’s an art. In product photography, the type of lighting is crucial – it can be either natural sunshine or artificial light, depending on what suits your product best.
But wait, there’s more to it. Where you place that light matters. It’s like finding the perfect angle to capture the essence of your product. You want the colours to pop and the details to shine.
Here’s the cool part – you get to play with the light. Adjust it, move it around, and find those sweet spots. Different lights do different things. Hard light throws shadows, emphasizing edges and angles. Soft light? It’s like a smoothening filter, making your product look alluring and touchable.
Now, let’s talk patterns. Continuous lighting, synchronized lighting – they’re not just fancy terms. They’re the techniques that can make or break your photo. It’s all about setting the mood and telling a story with your product.
In a nutshell, lighting is your best friend in product photography. It’s not just about brightness; it’s about making an experience, showcasing your product in its best light – literally!
Now that we know its importance, it’s time to explore which light is best for product photography.
Which Light is Best for Product Photography?
Let’s see the 5 major tips and tricks that can help you get the best product photography lighting setup.
1. Play Around to Improve Lighting
When you search for which light is good for photography, you will see a list of professional light suggestions. But if you are new to product photography, you don’t need a complete professional setup. You can use some simple techniques to help your product stand out. Like, if you don’t have a diffuser, a white sheet or even a piece of plasterboard can be the replacement you are looking for.
Now, steadiness is key. Pop that camera on a tripod, and you’re ready to roll. Set the stage against a plain wall or a trusty white paper backdrop, and bam – professional vibes without spending much money. If you want to learn more in-depth about hard and soft lighting, you should click here: Hard Light and Soft Light
2. Explore The World of Studio Lights
Dive into the world of studio lights.
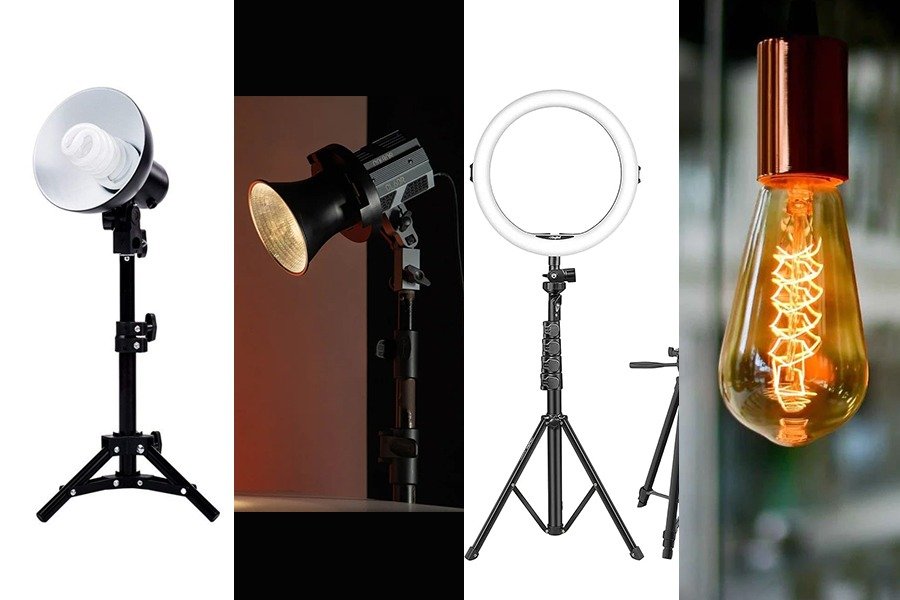
Fluorescent lights
First up, we’ve got Fluorescent lights. They’re like the energy-efficient buddies of the lighting world, usually hanging out at 60-100 watts. Affordable and friendly, but watch out for unexpected tints.
LEDs
Next, let’s meet the cool kids – LEDs. These are like the marathon runners, lasting longer with multiple tiny diodes. Energy-efficient? Check. Less heat? Double-check. Perfect for those long photography sessions.
Tungsten lights
And then, there’s the old-school Tungsten light. Inexpensive and the go-to for continuous light product photography softboxes. Adjustable and versatile, but be prepared for some heat.
Ring Light
Now, for the stars of the eCommerce stage – the ring light and the continuous light product photography softbox. Imagine three softbox lights, an overhead light, and two sidelights working their magic. That’s the dream team for your product photos.
3. Getting Rid of Reflections!
Now, I know that we are talking about which light is best for product photography, but do not forget to consider shadows. Some products love playing with reflections, especially jewellery, glass, and bottles. But, they can be tricky to photograph. Reflective surfaces bounce light in all sorts of directions, messing with colours and confusing buyers.
Think of shadows and camera reflections as those uninvited guests at a party. You definitely don’t want the camera lens photobombing your dazzling emerald ring. Editing out such details later is just a headache. So, instead of spending so much time on editing later, invest some time in fixing the lights’ arrangement until you find that perfect setup.
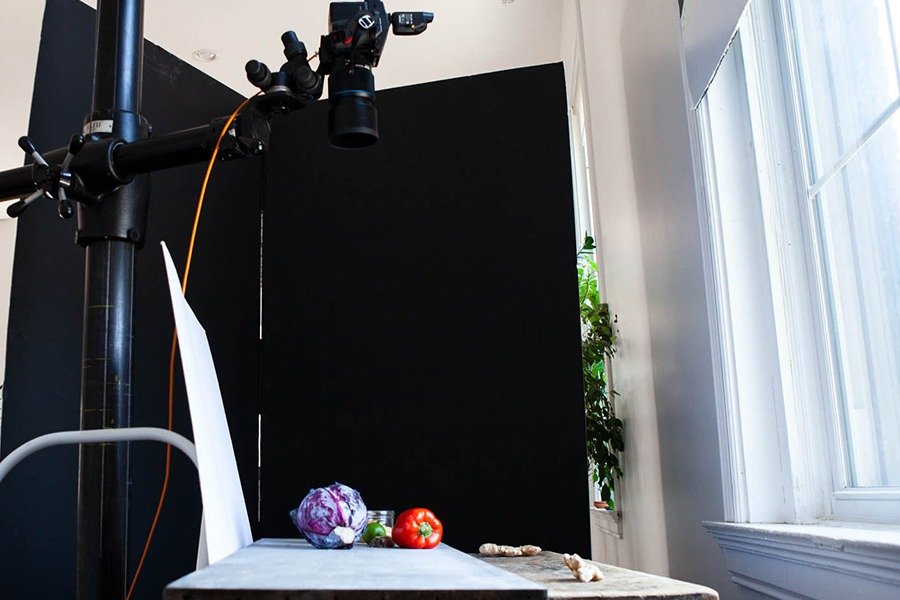
4. Let Your Product Shine with Smart Background Lighting

To take a great picture of your product, you want it to really stand out in the photo. How do you do that? Well, having the right setup of lights in product photography makes it bright and catches the eye of buyers.
You can also try different ways of lighting to get that perfect shot. It might change depending on the online store where you’re putting your product pictures. In the search for which light is best for product photography, we are finally here with a few choices to make your product photos look professional.
- Ring Lights for a Bright Front: Picture those gorgeous headshots. Ring lights are your go-to for a bright, well-lit front. Throw in a diffuser for that extra touch of uniformity.
- Overhead Octagonal Softboxes: Darker products need a bit of drama. Enter the overhead octagonal softboxes, giving your product that edgy, mysterious vibe.
- Say No to Direct Front Light: Reflective products cringe at direct front light. Even for others, it can be too much. Opt for a fast lens at a low aperture for that perfect balance.
- Two Lights on the Sides: Reflective products, you meet your match! Two lights on the sides, and a bit of optimization, and those pesky reflections vanish.
- The Versatile Three-Light Setup: Need versatility? Three lights got you covered. Capture details, emphasize form, or create that perfect background distinction – all with a three-light setup.
Light up your product, find that sweet spot, and let the world see its true brilliance!
5. Don’t Forget to Use Natural Lighting
In any list of which light is good for photography, it is compulsory to consider natural lighting. Feel free to use natural light when capturing your product photos. The key is to choose the right time; avoid shooting when the sun is high up in the sky to prevent overexposed shots and uneven lighting. The best results often come when the sun is beginning to come down, providing soft, bright, and evenly lit images—particularly effective for tabletop photography.
Summing Up
To conclude our search for which light is best for product photography, we first understood that the importance of a suitable product photography lighting setup cannot be overstated. However, there’s no one-size-fits-all formula. The lighting requirements vary based on factors like product size, material, and surface texture. Finding the perfect conditions may require some trial and error. Want to explore more about photography, you can watch here: Modular Light + Exploration of Light.
Aspiring product photographers preparing for a professional photo shoot should conduct research. Browsing catalogues and exploring images of similar products online can offer insights and ideas, helping them understand the diverse possibilities. Remember, a thoughtful approach to lighting will enhance the visual appeal of your product and grab the attention of potential buyers.