Easiest Way To Make White Background For Product Photography

No doubt, quality product photography is a very very important factor for an online store’s success.
And the type of photography that comes first in mind while taking product images for e-commerce is no doubt, white background images.
Now the question remains, how can you make a background for product photography? So, you might be a newbie photographer clicking pictures at your home or someone with more resources such as a small studio.
Worry not, we wrote this guide for both of you, we will see how can you create a white background for product photography and then how to take stunning white background pictures. So, let’s start,
How To Make White Background For Product Photography
Choosing The White Background

White Walls of Home: For the budget-conscious, your home might already provide the perfect white canvas. Smooth, untextured white walls can serve as an ideal backdrop. However, a word of caution: editing out off-white shades can be a bit tricky.
Budget-Friendly Poster Boards: If you’re just starting and wish to keep it simple, a white poster board is your friend. Cost-effective and widely available, these boards offer a clean, neutral background.
Adjust Lighting
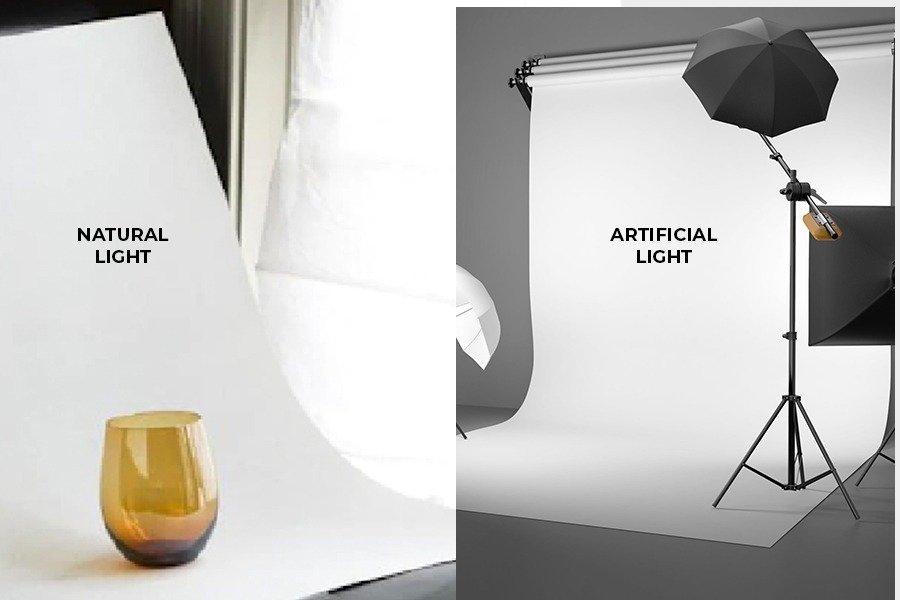
Using Natural Light: If you’re a fan of Mother Nature’s lighting, positioning your setup near a window is key. Natural light can help you present your photos in a soft, appealing glow.
Artificial Lighting: For controlled lighting, an artificial source is the right option. Invest in lights or a torch for a well-lit canvas.
DIY Lightbox Can Help Too

Constructing Your Box: A DIY lightbox can upgrade your white background product photography. Use a cardboard box, cut out openings, and cover them with white cloth or paper. Position lights on either side for an evenly lit scene.
Playing with Shadows: Softening direct light in your DIY lightbox minimizes shadows. Experiment with placement until you achieve that seamless, shadow-free look.
Editing Helps Perfecting
Even with the best setup, a touch of post-processing can enhance your white background. Tools like Photoshop or other user-friendly software can help refine your canvas.
Great, now you know how can you make a white background for product photography, so what to do next? Let’s click pictures!
How To Do White Background Product Photography

Download The Beginners Handbook For Product Photography
This handbook is your go-to guide for unleashing your creative potential. Don’t miss out – grab your FREE copy now!
To DIY your white background photos, you should follow these six key steps.
Step 1: Get Your Lighting Ready
The initial decision revolves around the source of your illumination. Two main options stand before you: natural light and studio light.
We already talked about natural and artificial light, now let’s see how can you use them better in your product photography.
1. Natural Light
- Location Matters: Find a cozy spot near a large window that invites plenty of indirect sunlight. Avoid direct sunlight to prevent unwanted shadows.
- DIY Softening: Enhance natural light by draping a white cloth or paper over the window. This simple hack filters and softens the incoming light.
- Timing is Everything: Shoot during the brightest hours of the day to maximize the available natural light.
2. Studio Lights
- Get a Soft Lightbox: If budget permits, grab a soft lightbox – your secret tool for consistent and flattering lighting.
- Lighting Setup: Arrange your key, fill, and background lights for the best light effect.
- Play with Angles: Experiment with the placement and angles of your lights until you achieve a pleasant balance of light and shadows.
But remember, even if you are using natural light or making a setup in the studio, the key aim is simple – uniform lighting. Make sure that your product’s top and sides are highlighted from the glow. Seek an even distribution of light and shadows, maintaining a consistent tone through out Lighting plays a very important role in product photography, explore the different techniques to control lighting here: Modular lighting and exploration of light
Step 2: Creating The Perfect Backdrop
With your lighting chosen, it’s time to set the stage for your product. Regardless of your light source, be it natural light against a white backdrop or the controlled lighting of a lightbox or tent, focus on the backdrop. Here’s the simplified breakdown, your backdrop whether white or any color, should smoothly curve without any harsh corners or imperfections. Think of it as creating a gentle curve rather than a sharp right angle.
Step 3: Placing Your Product
Now that your lighting and backdrop are in balance, let’s introduce your product to the spotlight. The key is the right placement.
- Front and Center: Your product should take the stage at the forefront of the backdrop, ensuring it steals the show.
- Strong Support: Whether it’s on a table, box, or lightbox, make sure your product rests on a stable, flat surface.
- Little Things Matter: For detailed items like jewelry, try hanging them with a fishing line or using glue dots to stand rings properly. Attention to these small details can upgrade your photo.
Step 4: Anchoring Your Camera With A Tripod
After the lights, backdrop, and product are aligned, let’s stabilize your camera setup. Here comes the tripod, a tripod maintains a steady focus and depth, preventing blurry shots. It’s about moving the product slightly, not the camera. Also, tripods enable the use of faster shutter speeds, capturing your entire product crisply.
If you want to learn more about tripods, you can click here; Types of stand
Step 5: Making Your Camera Ready
With your product placed and your setup ready, it’s time to fine-tune your camera settings for that perfect picture. Let’s break down the key adjustments you should make:
- Optimal Image Size: Choose the highest image and file size options your camera offers, aiming for RAW if available for superior quality.
- Flash Check: Ensure your flash is turned off, aligning with your chosen lighting setup, be it natural or studio.
- Lens: If you’re using a DSLR, stay away from wide-angle lenses to prevent any distortion of your products.
- ISO Magic: Adjust your ISO setting smartly. While a higher ISO brightens the image, it can also give distortion. For studio lighting, set it at the lowest – 100.
- Aperture: Aim for an aperture setting (A) between F8 and F11 to achieve an ideal depth of field. Stay away from overly wide apertures (like F2.8) to keep your entire product in focus.
- Shutter Speed Balance: Strike a balance with shutter speed; lower numbers brighten the photo but may make it a bit blurry. For stability, especially without a tripod, consider a timer.
- White Balance: For beginners, stick to “automatic” white balance. Advanced users working with studio lighting can experiment with the “flash” setting.
- Filter-Free Focus: Avoid digital filters or camera light filters to preserve the true colors of your product.
Step 6: Let’s Take White Background Images
Now that your setup is ready, it’s time to release your inner photographer and capture those stunning white background shots. Let’s get into some key tips to upgrade your product photography:
- Test Shots: Before diving into a full-blown photo session, click a test shot or two. This preliminary step ensures your camera settings, lighting, and product arrangement are spot-on. Taking test shots also lets you make necessary adjustments upfront, saving valuable editing time.
- Don’t Delete: Hold off on deleting any images directly from your camera during the shoot. Our judgment on a camera screen can be sudden, making you delete an amazing photo that you judged wrong. Wait until you transfer them to your computer for a more complete evaluation. Some digital cameras even offer a “shooting tethered” option, allowing real-time viewing on a computer screen.
- Angle Variety is Key: Keep the camera clicking from various angles. Experiment with different perspectives, capturing your product’s every face. Rotating and positioning the product provides a complete view, presenting its most attractive sides.
- Showcase Details: Your photos should be a visual exploration of your product. Highlight its texture, design, shape, and scale. Include clever techniques like placing a coin for size reference or zooming in on unique textures. Remember, your photos act as the eyes of the shopper, providing an exact depiction of the product.
Pro Tip: Feature multiple color options in a single product photo to help shoppers in selecting their preferred choice.
- Flaunt Features: Ensure your product’s special features are presented clearly. If you’re showcasing a wallet or purse, include shots with it both closed and open, presenting the interior. Capturing important features provides potential buyers with a complete understanding, helping their purchasing decision.
Wanna see how a white background image is shot? Watch this video here: white background for photoshoot
Conclusion
White background images are no doubt one of the best ways to present your product. Now creating a white background for product photography is the next task in the list.
Though, it is possible to make a white background for product photography in post-production, we do not suggest it. It comes with its issues. So, the suggested thing to do in this is to create your white background for the photography. We mentioned above the complete process of how you can make a background for product photography and then how you can shoot the best white background images.
Follow the above-given steps and you have the images you want. If you still have any doubts or questions, the comment box is open for you, we will be pleased to help you.
FAQs
1. How do photographers get a white background?
Photographers achieve a white background through proper lighting and backdrop setup. They use techniques like using a lightbox, soft light, or shooting near a window with natural light. Editing tools may also be used to improve the background.
2. Should product photography have a white or black background?
The choice between a white or black background depends on the product and the desired aesthetic. White backgrounds are common for e-commerce as they provide a clean, professional look. Black backgrounds can add drama and highlight certain products, offering a stylish and elegant feel.
3. Is natural light sufficient for creating a white background in product photos?
Yes, natural light can be enough to create a white background in product photos, but it depends on factors like the time of day, the size of the product, and the setup