8 Secret Ways To Avoid Shadows In Product Photography

In the world of product photography, clicking images that are free of unwanted shadows is a very important skill. Shadows distract your eyes from the product’s details, making it important to understand how to avoid shadows in product photography.
In this guide, we’ll explore step-by-step methods to avoid shadows in product photography, whether you’re a beginner or an experienced photographer. But first, let’s understand the reason why this issue is happening,
What Is Causing Shadows
Photography is all about manipulating and capturing light. You want the side of the product you’re photographing to be clearly visible which means that side of the product will have light on it. But the other side of that product will now have a shadow.
The art of photography involves adjusting your scene to capture it in the best way for your products. As a photographer, amateur or professional, you will be working with shadows. Now that you’ve accepted this fact, it’s time to choose your favourite way to eliminate them.
How To Avoid Shadows In Product Photography?
1. Understand Camera Settings
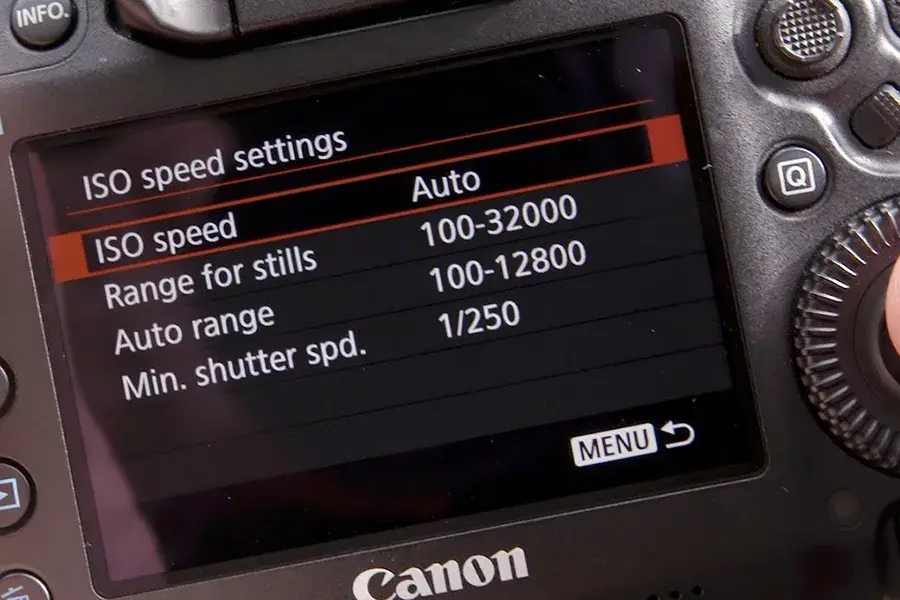
See, there is no magic setting on your camera that can eliminate shadows on its own but you can work in manual mode to get sharper photos with the right white balance, now this helps you decrease your time consumption in post-production.
Adjusting your camera’s settings can help adjust the exposure and lighting conditions for your specific product and shooting environment. Consider the following settings:
- Shutter Speed: Set the shutter speed between 1/60 and 1/200 to capture sharp images without much motion blur.
- Depth of Field: Reduce the depth of field to create a blurred background, which can help minimize distractions and focus attention on the product.
- White Balance: Experiment with different white balance settings to get accurate colours and eliminate any colour casts caused by artificial or mixed lighting sources.
By fine-tuning these manual settings, you can improve your photos during the shooting process and ease the process of shadow correction in post-production.
2. Choose The Right Lighting Setup

The key to avoiding shadows in product photography is selecting the right lighting setup. Think about using diffused lighting to create soft, even lighting around your product. Diffused light reduces harsh shadows and highlights, providing a more balanced and natural look to your photographs.
Natural Light: If you’re shooting near a window, use natural light to your advantage. However, avoid direct sunlight, as it can create strong shadows. Adjust your product so that it receives indirect, diffused sunlight.
Softbox or Umbrella: If you’re shooting indoors, invest in a softbox or umbrella to diffuse artificial light sources. These accessories spread light evenly, reducing the chances of harsh shadows. Experiment with different angles to find the right lighting for your product.
3. Understand The Angle Of Light
The direction from which light hits your product plays a very important role in the appearance of shadows. Pay attention to the angle of light and its effect on the subject.
Front Lighting: Position your light source in front of your product to minimize shadows. This technique brightens the entire product evenly and reduces the chances of shadows coming into the background.
Side Lighting: Experimenting with side lighting can add depth to your product shots. However, be careful with the shadows it may create. Use a fill light on the opposite side to soften and balance shadows.
Overhead Lighting: Avoid strong overhead lighting, as it can make shadows that distract the eyes from your product. If using overhead lights, ensure they are diffused and positioned at a small angle to minimize shadows.
4. Use Reflectors To Fill In Shadows
Reflectors are valuable tools in product photography as they bounce light back onto the subject, filling in shadows and creating a more balanced look.
White Foam Board: An affordable and effective reflector is a simple white foam board. Place it opposite your light source to bounce light back onto the product, reducing shadows.
Professional Reflectors: Invest in professional reflectors with silver, gold, or white surfaces. These can be adjusted to control the intensity and warmth of the reflected light, providing more variety in your setup.
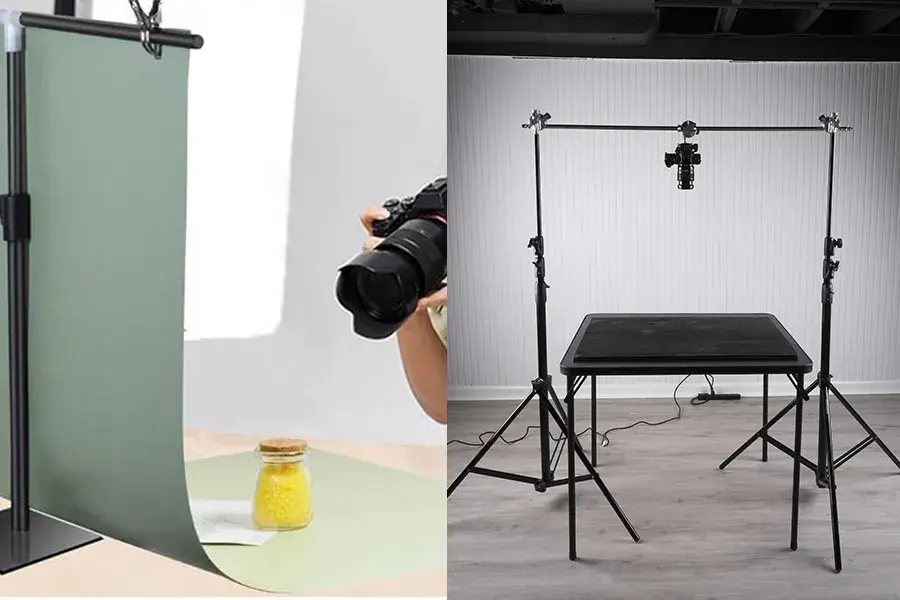
5. Consider The Background
The choice of background in product photography can impact the appearance of shadows. Go for a background that completes your product and avoids distracting shadows. How can you do it?
Seamless Paper: Use seamless paper as a backdrop to create a clean and distraction-free environment. Choose a colour that contrasts with your product to make it stand out.
Shooting Table: If you’re photographing smaller products, consider using a shooting table with a translucent surface. This allows light to pass through, reducing the chances of shadows.

Download The Beginners Handbook For Product Photography
This handbook is your go-to guide for unleashing your creative potential. Don’t miss out – grab your FREE copy now!
6. Control The Intensity Of Light
Sometimes, the solution to avoiding shadows lies in controlling the intensity of the light source. This can be achieved through various methods:
Dimmer Switches: If you’re using artificial lighting, invest in dimmer switches to control the brightness. This allows you to fine-tune the intensity of the light and avoid harsh shadows.
Light Diffusers: Attach diffusers to your light sources to soften the light and reduce its intensity. These can be easily mounted on softboxes or placed in front of artificial lights.
7. Use A Tripod For Stability
Stability is crucial in product photography, especially when dealing with lighting. Using a tripod ensures that your camera remains steady, reducing the chances of making unwanted shadows due to camera shaking.
Tripod Setup: Set up your camera on a stable tripod to keep it in a fixed position. This allows you to focus on adjusting the lighting without worrying about unwanted movements affecting your shot.
Remote Shutter Release: If possible, use a remote shutter release or the self-timer function on your camera to capture images without physically touching them. This further minimizes the risk of introducing shadows through camera movement.
Know more about tripods here: Types Of Stands
8. Experiment With Post-processing
While it’s important to get the lighting right during the shoot, post-processing can also help avoid shadows and improve the final image.
Dodge and Burn: Use the dodge tool to brighten areas affected by shadows and the burn tool to darken overly bright spots. This technique allows you to fine-tune the lighting in specific areas of your image.
Adjust Highlights and Shadows: Many photo editing software programs offer sliders to adjust highlights and shadows. Experiment with these settings to find the right balance and avoid distracting shadows.
Wanna learn post-processing better, click here: Post-Production
Conclusion
Mastering how to avoid shadows in product photography is a journey of exploration and experimentation. By understanding the fundamentals, applying practical techniques, and adopting advanced methods, you can upgrade your product images to a professional level.
Remember, each product is unique, so don’t hesitate to adapt these techniques to suit the specific features of what you’re photographing. With patience and practice, you’ll develop the skills to create stunning, shadow-free product photos that your audience will love.
FAQs
1. How to avoid shadows on backdrop?
Use a big, seamless background and position your light source carefully (above or behind the product) to avoid shadows. Diffuse the light with a softbox or even a white sheet.
2. How do you prevent shadows in photos?
Use softer light sources like window light with a white sheet in front or special studio lights with diffusers. Bounce light back into shadows with white or silver boards and try different light angles to see what works best.
3. What causes shadows in photography?
When something blocks the light, it creates a shadow. In product photos, it’s the product itself casting shadows on the background or other surfaces.
4. What are the two types of shadows in photography?
There are “cast shadows” which are the dark areas behind things, and “form shadows” which are the lighter shadows that show the shape of the object.
5. How do you minimize shadows in product photography?
Use soft light, bounce light back with reflectors, and play around with light angles. But remember, some shadows can actually make your photos look better by adding depth!