What Is Exposure? How You Can Use Them For Better Pictures?
What Is Exposure In Camera?
In photography, exposure means how much light gets to your camera’s sensor or film, affecting how bright or dark your pictures turn out.
Basically, there are three main settings that control exposure: shutter speed, aperture, and ISO. Shutter speed is how fast the camera’s shutter opens and closes, the aperture is how wide the lens opens to let in light, and ISO is the camera’s sensitivity to light.
Even though it might seem simple, exposure can still be confusing, even for experienced photographers. This is because there are many combinations of these settings that can give you the right brightness in a photo.
Just getting a photo that’s the right brightness doesn’t mean you’ve nailed exposure. Even your camera’s automatic mode can often do that. True mastery of exposure means finding the right balance between shutter speed, aperture, and ISO so the whole photo looks great, from the depth of field to how sharp it is.
Now that you know what is exposure in a camera, let’s see what does exposure triangle means,
What Is Exposure Triangle?
The exposure triangle is made up of three key parts that control how much light your camera captures: aperture, shutter speed, and ISO. When you adjust these parts properly, you get a well-exposed photo.
These three parts of the exposure triangle work together. If you change one, you might need to change another to keep the exposure right. Sometimes, photographers call it the photography triangle or camera triangle too.
Aperture, shutter speed, and ISO aren’t just about exposure, though. They also affect other things in your photos, like how much of the picture is sharp (depth of field), whether moving objects look blurry (motion blur), and if there’s any graininess in the picture (noise).
Aperture
Let’s talk about aperture! In the exposure triangle, the aperture is like the size of the hole in your camera lens. It controls how much light gets through to the sensor.
When you press the shutter button, the aperture opens up to a certain size, letting in just the right amount of light. Aperture works together with ISO and shutter speed to get the exposure right in your photos.
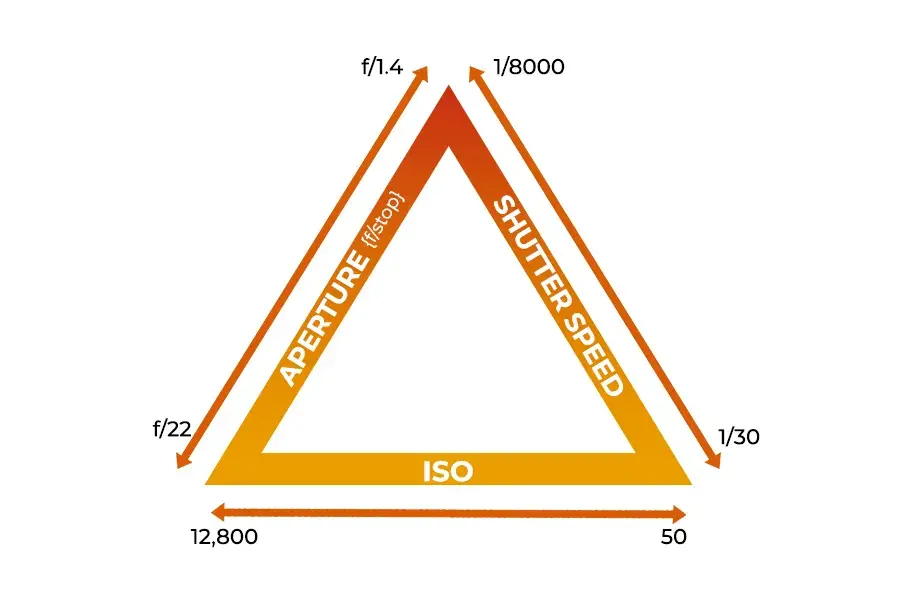
Check out this cheat sheet of the exposure triangle for quick reference next time you’re out shooting!
The exposure triangle chart shows that the width of a camera lens’ aperture is measured in f/stops, with numbers like 1.4, 2, 2.8, 4, 5.6, 8, 11, and 16.
Smaller apertures, such as f/16, let in less light, while larger apertures like f/1.4 let in more light. While the aperture is super important in exposure triangle photography, it’s closely tied to our next variable: shutter speed.
Shutter Speed
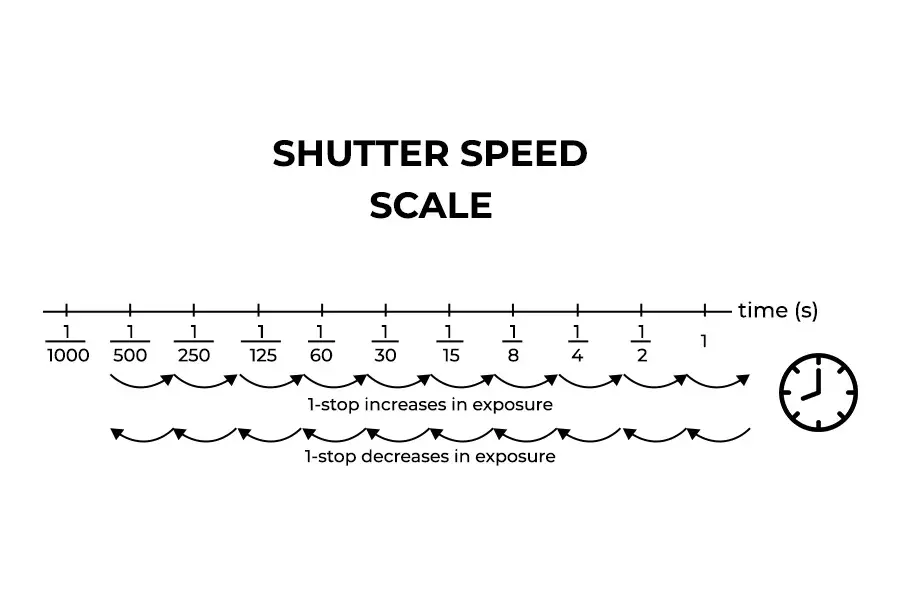
Shutter speed is all about how long the sensor gets hit by light. It’s measured in seconds. Shutter speed might be the easiest part of the exposure triangle to grasp.
To get twice as much light, just double the exposure time. For instance, going from 1/60 s to 1/30 s doubles the time the shutter opens, adding a stop of light. But if you change from 1 second to 1/8 s, you’re actually reducing the light by three stops. Why? Because going from 1 second to 1/2s is one stop, then from 1/2s to 1/4s is another stop, and finally, from 1/4s to 1/8s is another halving of the time, making it the third stop.
ISO
The last part of the exposure triangle is ISO. Think of ISO as how sensitive the digital sensor is to light (though it’s a bit more complex than that).
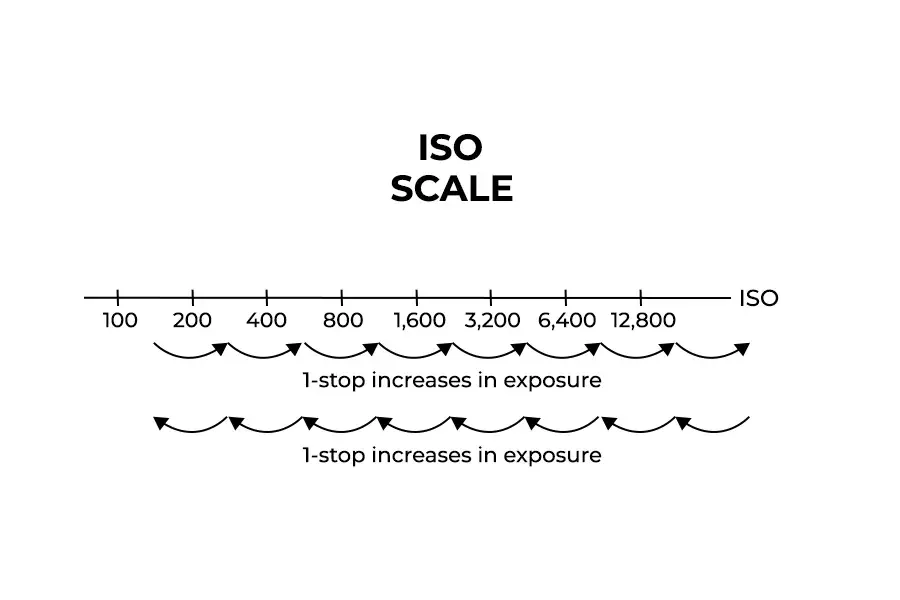
Higher ISO values mean the sensor doesn’t need as much light for proper exposure. Lower ISO values mean the sensor needs more light.
The ISO scale is straightforward, like shutter speed. Doubling the ISO adds one stop of exposure while halving it reduces the exposure by one stop.
Great, so now we learned what is exposure in a camera and what is exposure triangle, let’s get a step forward to learn the 4 types of exposure.
For better visual learning, you can check our premium video here: How Camera Works
4 Types Of Exposure In Camera
There are four main types of exposure you can achieve by adjusting your shutter speed, aperture, and ISO:
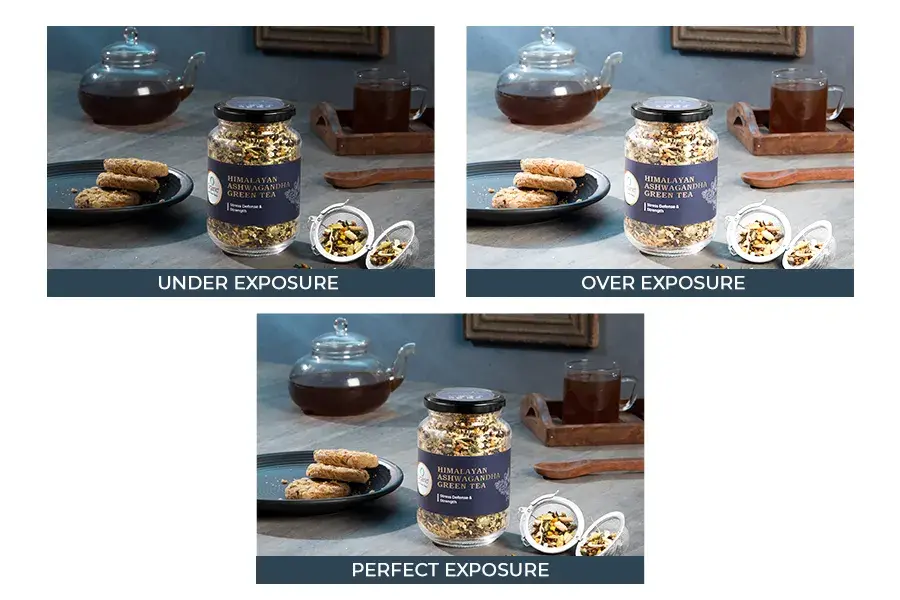
Over exposure: This occurs when too much light reaches the film or sensor, causing bright parts of the photo to lose detail and become washed out.
Under exposure: This happens when not enough light reaches the film or sensor, resulting in shadowy areas losing detail and appearing almost black.
Long exposure: Also known as time exposure or slow-shutter photography, this technique captures a subject over a prolonged period. It’s often used in night photography, capturing static elements alongside motion, which creates blurs, smears, and trails.
Double exposure: Also called multiple exposure, this technique involves opening the camera shutter twice to expose the film to different images. The result is a single photograph combining both exposures layered on top of one another.
How To Set Exposure On A Camera
In digital photography, you can easily adjust the camera’s exposure mode using a button or dial. There are three main modes and settings:
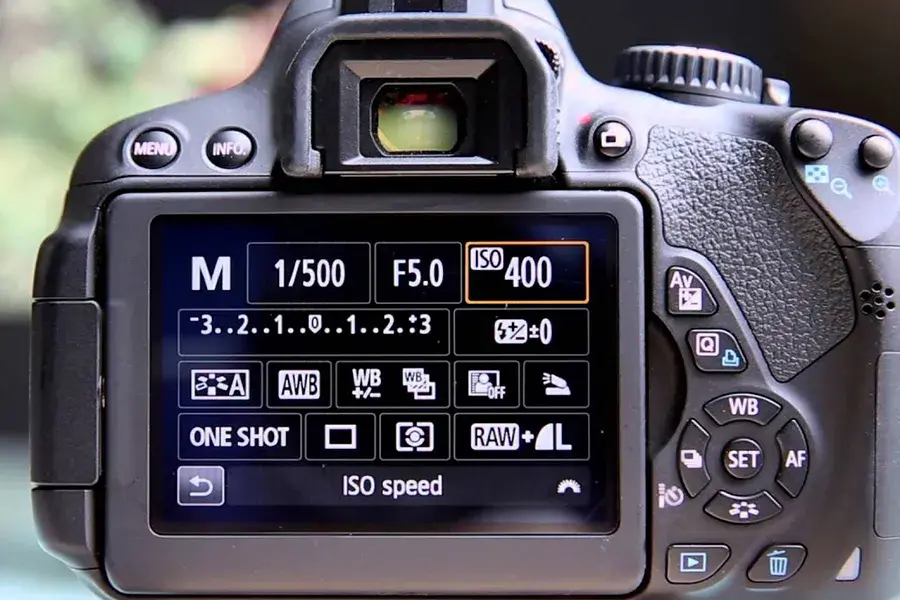
Manual exposure: You choose the shutter speed, aperture, and ISO yourself. This gives you total control over the camera settings, ideal when you have time to adjust for each shot.
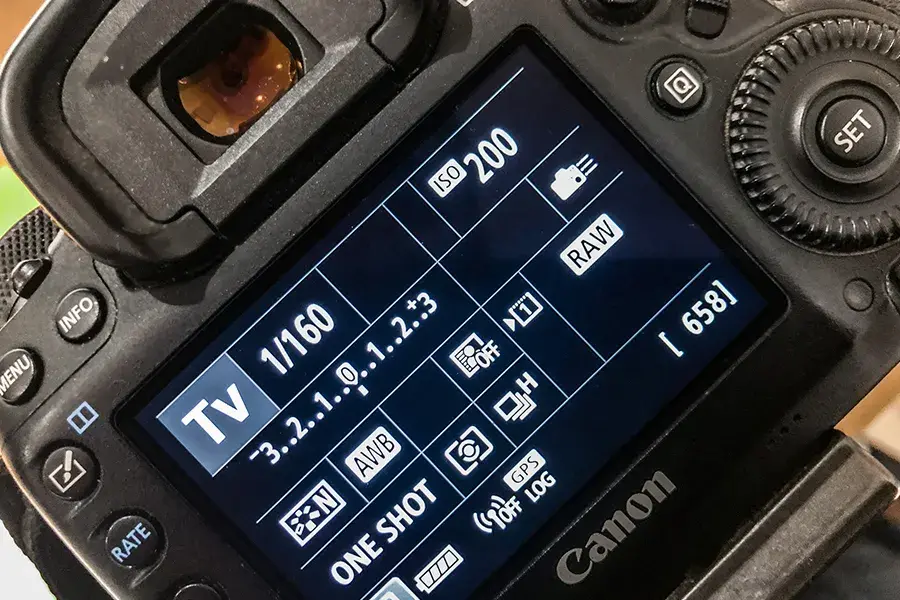
Shutter priority: You select a specific shutter speed, and the camera automatically sets the aperture. This is handy when you want to control how motion is captured.
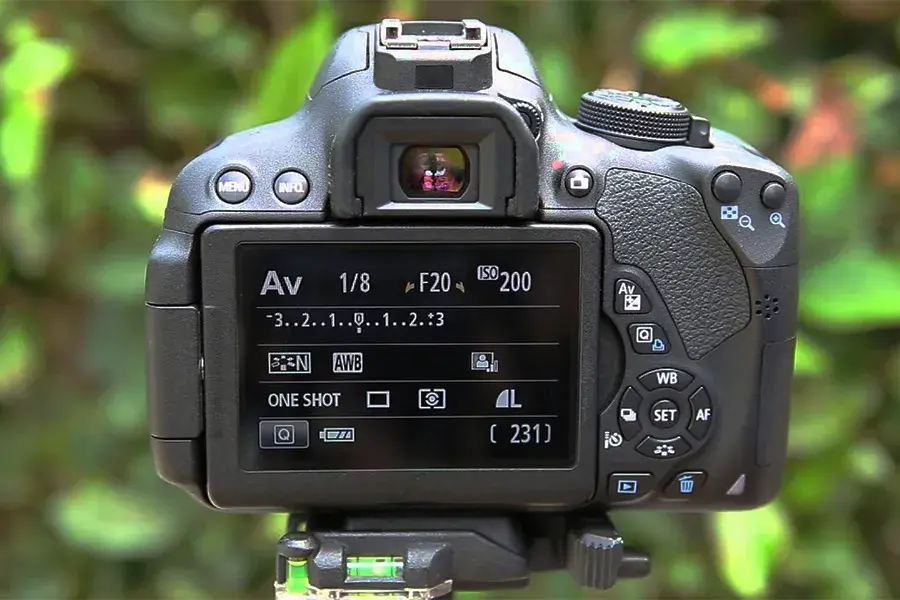
Aperture priority: You pick a specific aperture, and the camera automatically adjusts the shutter speed. This is great for controlling the depth of field.
Both shutter priority and aperture priority modes have their advantages, and you might switch between them depending on what you’re shooting. It’s often a good idea to set your ISO to Auto in these modes, so the camera can adapt to different lighting conditions and get the best shot possible.
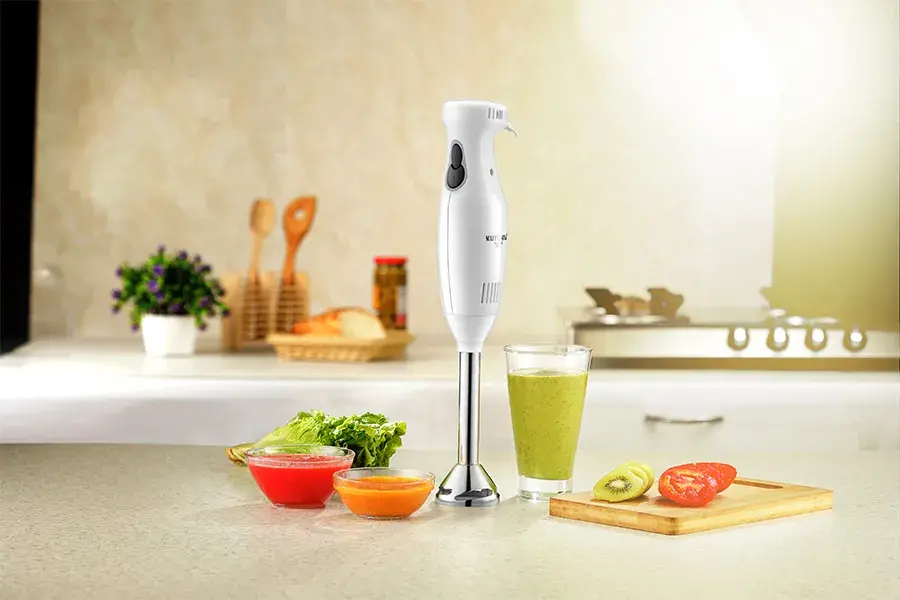
The Best Camera Settings For Exposure In Product Photography
In product photography, getting the right exposure is key to showcasing your products in the best light. Here are some camera settings to help you achieve optimal exposure for your product shots.
Aperture: Adjusting the aperture controls the amount of light entering the camera. For product photography, using a mid-range aperture like f/8 to f/11 is often recommended. This ensures that your product is sharp and in focus while still allowing enough light to reach the sensor.
Shutter Speed: Shutter speed determines how long the camera’s shutter remains open to capture the image. In product photography, using a slower shutter speed can help capture more light, especially when shooting in low-light conditions. However, be cautious of using too slow a shutter speed, as it can result in motion blur if the product or camera moves during the exposure.
ISO: ISO measures the sensitivity of the camera’s sensor to light. Increasing the ISO allows you to capture brighter images in low-light situations, but it can also introduce digital noise or graininess to the photo. For product photography, start with a low ISO setting, such as ISO 100 or 200, and adjust as needed based on the available light.
By adjusting these camera settings, you can achieve well-exposed product photos that highlight the details and features of your products. Experiment with different settings to find the perfect exposure for your specific shooting environment and desired aesthetic.

Download The Beginners Handbook For Product Photography
This handbook is your go-to guide for unleashing your creative potential. Don’t miss out – grab your FREE copy now!
Conclusion
Exposure might seem complex, but it’s crucial if you want to capture top-notch photos. The key? Get out there and try it out for yourself! Experiment with different exposure settings and ISO levels. Notice how they change your photos.
Remember, practice makes perfect. Exposure is a skill that constantly improves with time and practice. So keep at it! Learning exposure is worth the effort.
Love photography? Want to start a career in it? Click here: FDS Masterclass and Join the FDS Masterclass on Product Photography with personally designed lessons to ensure you gain the skills needed to capture stunning images.
FAQs
1. What does exposure mean in photography?
Exposure in photography refers to how much light reaches the camera’s sensor or film when taking a photo. It determines whether the image appears bright or dark, and it’s controlled by adjusting settings like shutter speed, aperture, and ISO.
2. Why is exposure important?
Exposure is crucial in photography because it directly affects the quality and appearance of your photos. Proper exposure ensures that your images have the right balance of light and shadow, capturing details accurately and producing visually pleasing results.
3. What is the best exposure in photography?
The best exposure in photography depends on the specific scene and the desired outcome. There’s no one-size-fits-all answer. It’s about finding the right balance between the brightness of the highlights and the darkness of the shadows to achieve the desired artistic effect. This often involves adjusting settings like shutter speed, aperture, and ISO to capture the scene accurately while maintaining the intended mood or atmosphere.